I must admit, I have never been a big fan of Hyper-V. Especially, having been deep in the VMware virtualization platform for over 15 years. I wanted to like it, but really struggled in getting it deployed and connected. If the server had the full Windows Server operating system installed, it was easy enough. However, in a virtual environment, that defeats the purpose. When it comes to virtualization, you want the most minimal OS installed so the bulk of your resources are dedicated towards virtual machines. Trying to install it with only Windows Server Core is where I struggled.
When you install something like VMware on a host, to connect it to vCenter you just add the server’s name and supply the root account information. Then, vCenter just connects and pulls in the host. When installing Hyper-V on Core, even domain joined, the Hyper-V manager could not connect to the host. Allowing that connection involved running various PowerShell commands to make changes to the firewall settings. The entire process just seemed overly complicated and difficult. While I ran other hypervisors in my lab besides VMware, like Citrix Hypervisor, I finally stopped trying with Hyper-V.
That changed when I attended Microsoft Ignite 2025. Especially, the pre-day session called on what was new and coming for Windows Server 2025. It was a 4-hour session on all of the improvements that were either already available or coming in Microsoft’s latest server version. During this session, there was a discussion on the current improvements in Hyper-V, as well as a forth coming, browser based, virtualization manager for the product. Combining these announcements, as well and discussions with some of the companies like DataON, had me curious. So, I decided to give it another shot in the lab and here are my impressions. Now, as of this writing, the web-based virtualization manager is in “PREVIEW” mode, so it is subject to change.
Hypervisor Installation
I had an unused server in my lab so I decided to use it for the core OS deployment. I did run into a small issue at first, because the server is a PowerEdge R610 I bought off eBay a few years ago and had been an EMC Recover Point appliance. I had upgraded the processors, added memory, and flashed the firmware at the time, but due to the age, the RAID controller driver was not included in the Windows Server 2025 install ISO. So, back to the old days of tracking down a Dell PERC 6/I driver that would work and adding to OS. After that hurdle was overcome, the rest of the installation went smoothly.
With the initial core OS install behind me, I started configuring the server’s network settings, joining it to my domain, and performing all of the general tasks needed with an initial server deployment. Once all of that was complete, I then ran the PowerShell commands needed to install the Hyper-V feature. This is done with the command:
“Install-WindowsFeature -Name Hyper-V -IncludeManagementTools -Restart”
This command performs the installation and then reboots the server when completed. The process takes about 5-10 minutes to install. Also, what was not mentioned, but seemed to be a requirement to connect to the Windows Admin Center, was to enable the “File and Printer Sharing” feature. I had to come back and run the PowerShell command below to allow it to connect.
“Set-NetFirewallRule -DisplayGroup “File and Printer Sharing” -Enabled True”
Now that the server OS was installed, now was the time to set up the new virtualization manager.
Windows Admin Center – Virtualization Mode
Before you can install this feature, there are a few prerequisites that need to be taken care of first. The server (virtual or physical) must have 4-cores, 8G of memory, and 10G of free space. It also must be Windows Server 2025 or later. So, before I could install it, I had to create a VM meeting these specifications. Once the OS is installed, the Microsoft Visual C++ must be installed. The server is now prepared to install vMode of the Windows Admin Center. Download the latest version from Microsoft and launch the installer. The express installation is fairly straight forward, there is the point it asks for a TSL certificate, but there is the option to use an expiring self-signed one. Since this was for a test lab, that is the option I selected. After a few minutes, the browser comes up to a login screen.
Connection and Functionality
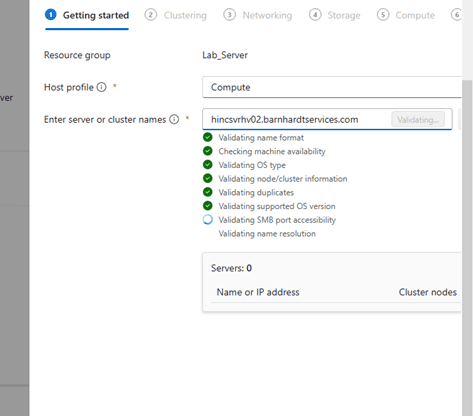
Once launched, then came the time to connect the newly created Hyper-V server to the Virtualization Admin Center. This involved creating the first “Resource Group”. At first, I thought adding a standalone server might be an issue, as I had to look through the options, as it seemed to be looking more for a cluster than a single server. However, I was able to determine the settings. From the image below, you can see that “Hyperconverged” systems are still coming, but for my standalone server, I found I needed to select “Use existing storage already configured on the system”
To my surprise, the system connected to the server, evaluated it, and started the process of validating and ensuring the system met all requirements to be managed.
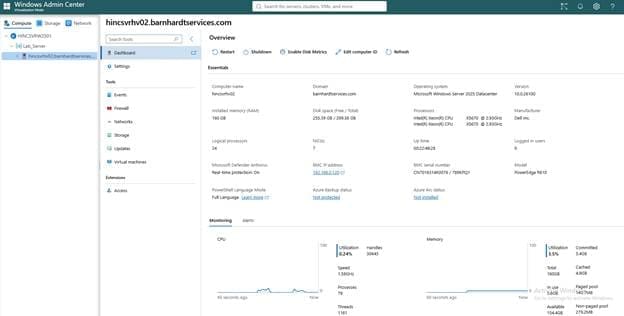
After the initial resource group and server has been added, the Windows Admin Center seems to have a nice visual layout as well as overview of the environment as seen below.
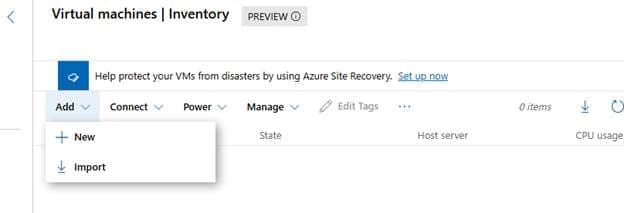
With the Admin Center deployed in vMode, now came the time to see how the virtual machine creation process worked. Keep in mind that everything about this feature at the time of this writing is “PREVIEW”. The creation of a virtual machine starts with the “Add” drop down. This gives you the option for either a new or to import a virtual machine.
Configure the required resources for the virtual machine, then click on the “Create” radio button.
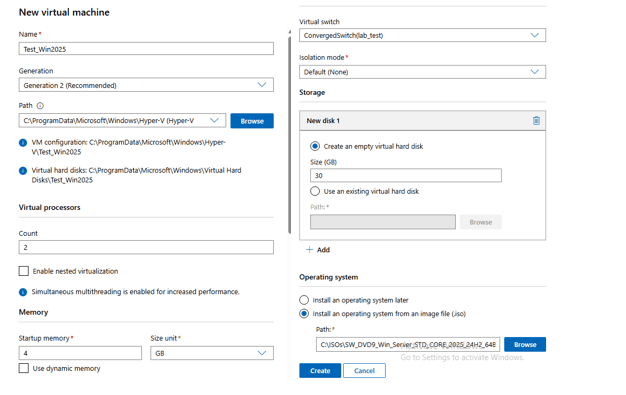
The new server was created in under a minute and is in a powered off state once the creation has completed. You can power it on by either right-clicking the server or from the “Power” drop down.
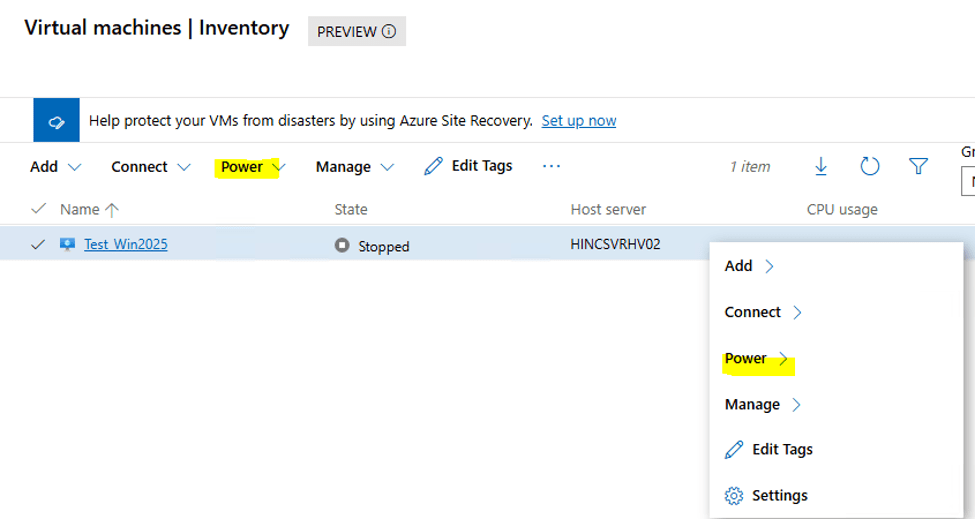
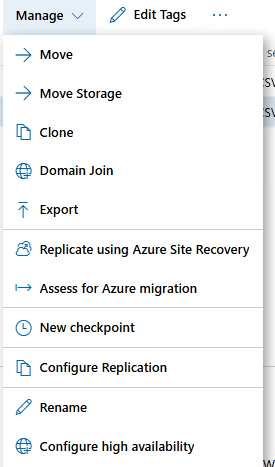
To connect to the console, there is a very “Azure” feel to the options. When the “Connect” drop down is selected, there is an option to download an RDP file. There are not console options as in previous versions or other products, just an RDP connection. This is true even for installing the operating system. Once I was connected, the installation was a normal Windows Server installation. Once the operating system is installed, right-clicking on the server shows a wide variety of options from creating “checkpoints” (aka snapshots) to replicating to Azure.
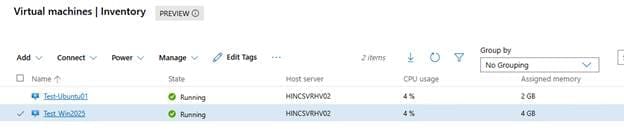
With a Windows test server deployed, I thought I would see how it was to install an instance of Ubuntu. With the latest ISO downloaded, I configured a server and connected the ISO to the DVD drive. Installing Ubuntu added an extra step. Initially on boot, there was a PXE error. In researching, I found that for this error, secure boot had to be disabled. Likely because the default configuration is for Windows Servers. Once that was disabled, the system booted from the installation ISO with out any issues. At this point, I was able to install the OS just as if it was on independent hardware or any other virtualization platform.
Summary
Overall, I was impressed with how far along Hyper-V has come since I had tried testing it over 10 years ago. I have had some interaction with it since that time, as many of the Microsoft training classes have labs running on the platform, but this was the first time performing an install in years. Connecting a server running Hyper-V on core was much simpler than before. Even virtualization mode of the Windows Admin Center was easy to install and configure. I will say the response was a little sluggish in terms of the page loading and refreshing at times. However, this is a lab environment with older hardware and limited resources. The product is also still in preview, so improvement in performance could still be coming. Overall, I was impressed with the product and look forward to working with it more in the future. I am sure I will have more to write about as the experimentation continues.
Leave a Reply